
| Contents | Index | JAMS Home | Support |
 | ||||
|
| Previous | Contents | Index |
This monitor is a high performance batch job monitor. It does not scan the OpenVMS batch queues to obtain its information. The JAMS_SCHEDULE process broadcasts messages to the monitors when events occur. Running the JAMS monitor will not affect the performance of the OpenVMS batch and print queue sub-system. |
Figure 6-4 Monitor Jobs Display
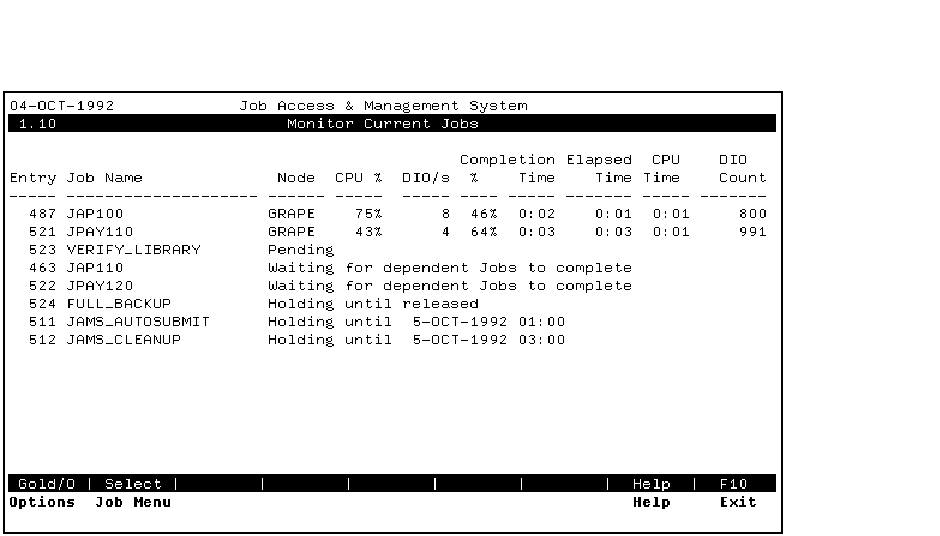
Figure 6-4 is an example of the Monitor screen display. This example shows a number of batch jobs which are in various states. The first job is a registered job which is executing. If a job is executing, performance information is included in the display. If the job is not executing, the performance information is replaced by a text message which indicates the current status of the job. When a job completes, the text message indicates the final status of the job.
The display includes the following information about this job:
This is the JAMS entry number for the job.
This is the name of the job as specified in the JAMS Job definition.
This is the name of the node on which this job is running.
This column shows the CPU utilization percentage for this job during the most recent update interval.
This column shows the average number of direct I/Os per second which this job performed during the most recent update interval.
If this job is registered in the JAMS database, we can compute the completion percent based on the Job's past performance. This percentage is an estimate of how close to completion the Job is. This can be a useful monitoring tool. If an operator sees a Job which shows a completion percentage of 200%, they know that the Job has used twice the resources which it normally takes and they may want to take corrective action.
This percentage is calculated using the Jobs current and average CPU usage and Direct I/O count so running the a Job on a heavily loaded system will not affect this calculation.
If this Job is registered in the JAMS database, we can calculate how much longer the Job is going to run based on the Job's past performance. This calculation is based on the Job's current CPU utilization and direct I/O per second count. We extrapolate this data to determine how much longer the job will run before reaching its average CPU usage and direct I/O count.
This shows how long the Job has been executing, in hours and minutes.
This shows how much CPU time the Job has accumulated, in hours and minutes.
This shows the number of direct I/O operations performed by the Job.
The display may also include a line which shows a Job's status information. A batch job may use the JAMS SET STATUS/MONITOR command to set it's status text. If the /MONITOR qualifier is used then the status text will be displayed in the Monitor window.
The [Gold/C] key is used to establish a connection with a remote node, disconnect an already established connection or switch to an existing connection.
The [Gold/O] key is used to display and modify the Monitor Options. When you press the [Gold/O] key, updating stops and the Monitor Options screen is displayed as shown in Figure 6-5.
The [Gold/N] key is used to switch to the next connection.
The [Select] key is used to select a job and pop-up the Job
Management Menu. Use the [Next Screen], [Prev
Screen], and arrow keys to move the cursor to the desired job
then press the [Select] key. The selected job will be
highlighted and the Job Management Menu will pop up as shown in
Figure 6-6.
6.1.5.1 Monitor Options
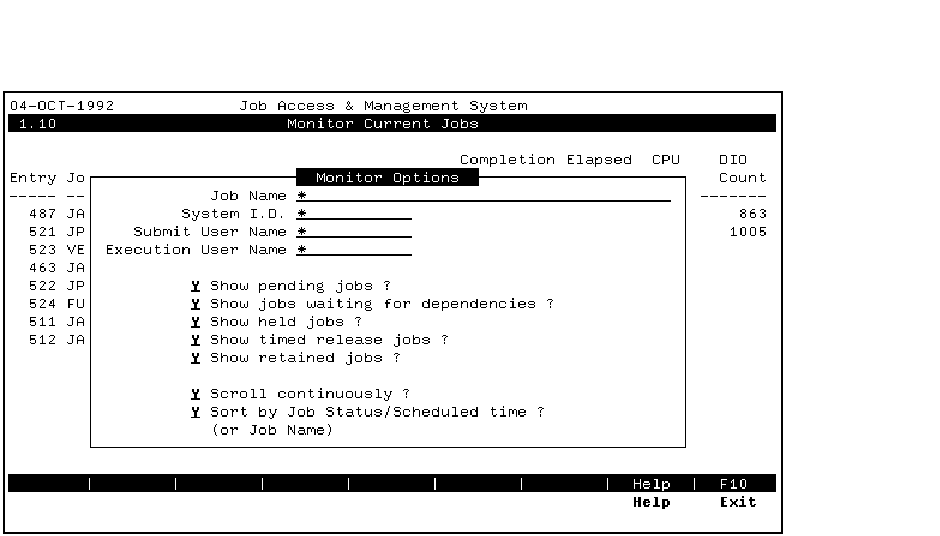
The Monitor options screen is used to set the characteristics of your monitoring session. You can set job selection criteria, sorting and scrolling options. You can also limit the display to only jobs submitted by your username. The Monitor Options screen is shown in Figure 6-5.
Figure 6-5 Monitor Options
You can enter a standard OpenVMS wildcard expression here and only Jobs which match the wildcard expression will be shown.
You can enter a standard OpenVMS wildcard expression here and only Jobs whose System I.D. match the wildcard expression will be shown.
You can enter a standard OpenVMS wildcard expression here and only Jobs which were submitted by a user with an OpenVMS username which matches the wildcard expression will be shown.
You can enter a standard OpenVMS wildcard expression here and only Jobs which will execute with an OpenVMS username which matches the wildcard expression will be shown.
If you enter a Y, jobs which are pending will be included in the monitor display.
Show jobs waiting for dependencies ?
If you enter a Y, jobs which are pending because they are waiting for dependent jobs to complete will be included in the monitor display.
If you enter a Y, jobs which are holding until explicitly released will be included in the monitor display.
If you enter a Y, jobs which are waiting until a specific date and time will be included in the monitor display.
Show completed/retained jobs ?
If you enter a Y, jobs which have been retained in the batch queue after completion will be included in the monitor display.
If you enter a Y, when the monitor has more jobs to display than can fit on the screen, the job list will continuously scroll so that all jobs can be displayed.
Sort by Job Status/Schedule time (or Job Name)
If you enter a N here, the Jobs are sorted by Job Name.
If you enter a Y here, the Jobs will be sorted by status and scheduled date/time. The order is as follows:
The Job Management Menu is used to manage jobs which are executing or pending. A pending job must be known to JAMS before it will display in the Monitor window. Please refer to the the JAMS Reference Manual section in Chapter 5 for information on when and how a job becomes known to JAMS.
To use the pop up Job Management menu, use the [Next Screen], [Prev Screen], and arrow keys to move the cursor to the desired job then press the [Select] key. The selected job will be highlighted and the Job Management Menu will pop up as shown in Figure 6-6.
You must be properly authorized to use many of the functions available on the Job Management menu. Authorization is defined by the MONITOR ACL, the Job's ACL and the System's ACL.
Figure 6-6 Job Management Pop-up Menu
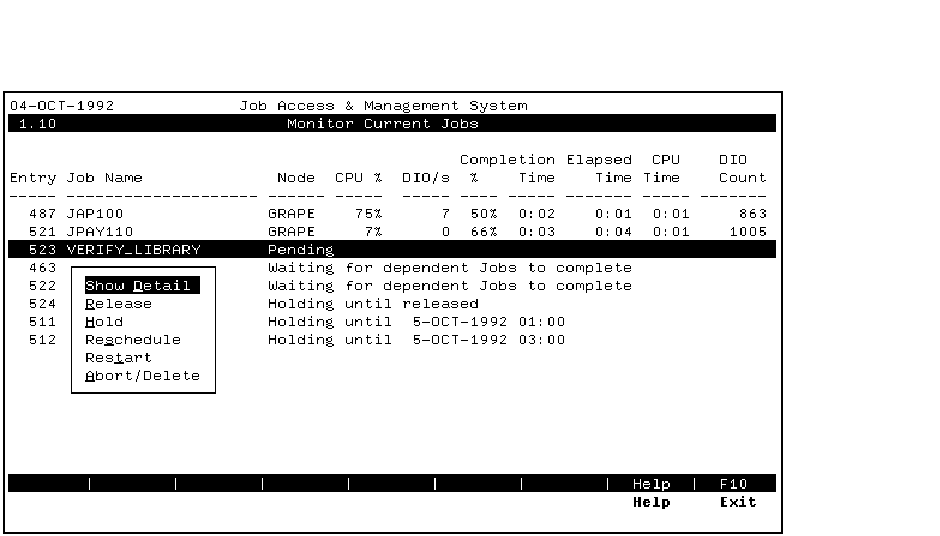
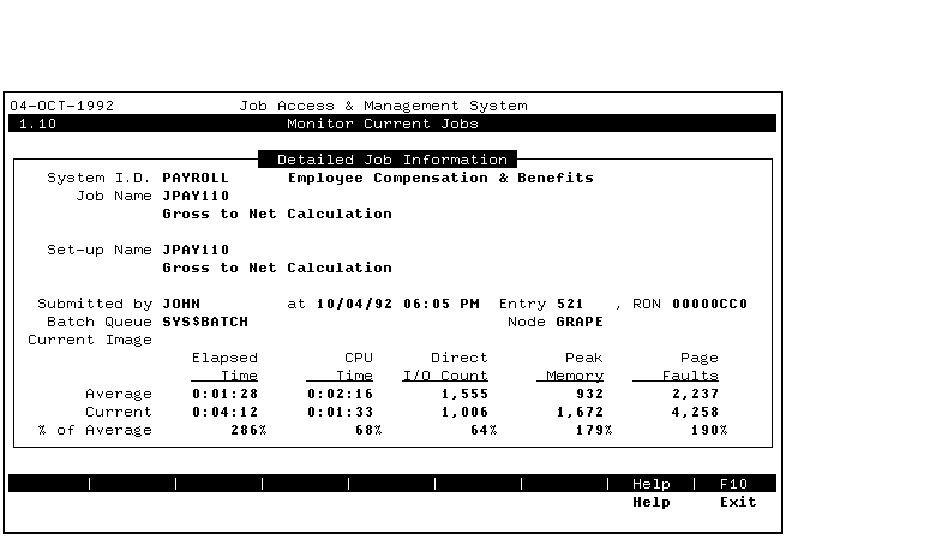
This option will display detailed information about the selected job. Figure 6-7 is an example of this display. If the job is executing, the performance information is updated every five seconds. If the job is not executing, the performance information is replaced by a list of dependent jobs which this job is waiting on, if any.
Figure 6-7 Job Detail
Jobs can be in a pending or holding state for many different reasons. When you elect to release a job, a form will appear showing all the reasons this particular job is not running. You can then decide to remove some or all of the constraints which are keeping the job from executing.
The selected job is held until released.
This option is used to change the scheduling attributes of a job which is not executing. A screen is displayed which allows you to change the job attributes.
This option is used to abort and restart an executing job. A screen is displayed which allows you to enter where the job should execute as well as the hold status. If you exit from this screen, no action is taken. If you complete the form and press [Return], the job is aborted and either restarted or placed on hold.
If the selected job is currently executing it is aborted. Otherwise the
job is deleted from the schedule.
6.1.6 Management Functions
The Management Functions option pops up a sub-menu with the following
options available:
6.1.6.1 Named Times
The Named Times option is used to maintain Named Times. This is a standard maintenance function. Working with standard maintenance functions is explained in Section 6.2.9.
For a complete description of the attributes of a Named Time
definition, refer to the JAMS Reference Manual.
6.1.6.2 Dates
The Dates option is used to maintain special Date definitions. This is a standard maintenance function. Working with standard maintenance functions is explained in Section 6.2.9.
For a complete description of special Dates definition, refer to
the JAMS Reference Manual.
6.1.6.3 Access Control
The Access Control option is used to maintain Access Control Lists for many of the JAMS functions. A menu is displayed which lists the available Access Control Lists. Once you select an ACL to modify, the ACL is displayed in a list and you can select a specific Access Control Entry (ACE) to modify or insert or delete ACE's.
For a complete description of each of the ACL's and the rights
available, refer to the JAMS Reference Manual.
6.1.6.4 Node Definitions
The Node Definitions option is used to maintain Node definitions. This is a standard maintenance function. Working with standard maintenance functions is explained in Section 6.2.9.
For a complete description of the attributes of a Node definition,
refer to the JAMS Reference Manual.
6.1.6.5 Node Groups
The Node Groups option is used to maintain Node Group definitions. This is a standard maintenance function. Working with standard maintenance functions is explained in Section 6.2.9.
For a complete description of the attributes of a Node Group
definition, refer to the JAMS Reference Manual.
6.1.6.6 Configuration
The Configuration option will display a data entry screen which
contains all of the JAMS configuration attributes. For a
complete description of all of the configuration attributes, refer to
the JAMS Reference Manual.
6.1.6.7 Date Types
The Date Types option is used to maintain Date Type definitions. This is a standard maintenance function. Working with standard maintenance functions is explained in Section 6.2.9.
For a complete description of the attributes of a Date Type definition,
refer to the JAMS Reference Manual.
6.2 Common Functions and Features
The JAMS screen based user interface provides a common
interface to each function. Once you learn to use one function learning
to use the next one is simpler because the interface is the same. The
following sections describe the common features and functions of the
screen based interface.
6.2.1 On-line Help
The JAMS screen based environment provides extensive on-line help. You access the on-line help by pressing the [Help] or [PF2] key.
The JAMS full screen help utility is similar to the standard OpenVMS Help utility. When you press the [Help] key, help text will be displayed for the current menu or field. You can use the [Next Screen] and [Prev Screen] keys to scroll the help text.
If there are additional topics available, there will be a box menu below the help text which is used to select one of the additional topics. Use the arrow keys to change the highlighted topic and press [Return] to display the selected topics help text.
Press the [Exit] key to exit help and return to the
application.
6.2.2 Menus
Menus are used in many places in the JAMS Maintenance sub-system. Menus are presented in the center of the screen as a vertical list of options surrounded by a bounding box. The currently selected option is highlighted with reverse video.
Use the arrow keys, space bar, [Tab] and [Ctrl/H] keys to move the highlighted option. Press [Return] to Select the highlighted option. You can exit a menu by pressing the [Exit] key (F10).
You can also select a menu option directly by pressing the highlighted
letter of the menu option. The highlighted letter is underlined.
6.2.3 Insert/Overstrike
When the cursor is in a field, you can press [Ctrl/A] to
toggle between insert mode and overstrike mode. Insert mode does not
work in date and time fields.
6.2.4 Moving Between Fields
When the cursor is in a data entry screen, you can move to the next
field by pressing the [Tab] or down arrow key. You can move
to the previous field by pressing the up arrow key, or
[Ctrl/H] (backspace).
6.2.5 Exit Key
The [Exit] (F10) key is used to go back one logical level. The [PF4] can also be used in place of the Exit key. You can also use the [Ctrl/Z] key to exit back to the DCL level.
The [Exit] and [Ctrl/Z] keys will abort any
changes which are in progress.
6.2.6 Find Key
Many fields (including most key fields) have search capabilities. When the cursor is in a field with search capabilities, "Find" will be displayed in the Function Key Label. You can press the [Find] key and a search list will be displayed. If the field has a limited number of values, the possible values are displayed in a list, and you can select the desired value.
If the field could have many different values, such as a Job Name, the
list will have one or more search keys at the top of the list. You can
enter information into these fields to narrow the search then press
[Return] to start searching. The list of data records found
is displayed in the bottom portion of the list, and you can select one
of the values.
6.2.7 List Screens
List screens are similar to menus. A vertical list of available options
is displayed and you can use the arrow keys to move the cursor through
the list. A list may also be larger than the available screen size. In
this case, the data will scroll within the list window. You can use the
[Next Screen] and [Prev Screen] keys to scroll by
pages. You can also press [Gold/Up Arrow] to move to the
first item in the list or [Gold/Down Arrow] to move to the
last item in the list. To select an item in the list, move the cursor
to the line which contains the item you want to select and then press
[Return].
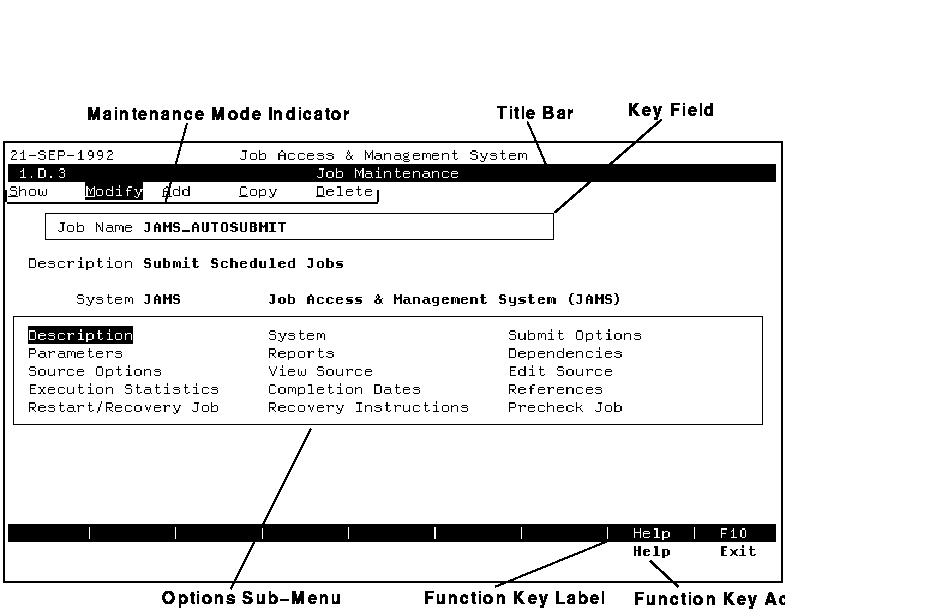
6.2.8 Screen Layout
A Sample JAMS Screen is shown in Figure 6-8. The top three lines of the screen display status information. The first line contains the current date, the sub-system title and version information. The second line contains a title bar which consists of a numeric screen identifier and a description or heading. If this is a maintenance function, the third line is used for a horizontal strip menu used to select and display the maintenance mode.
The bottom three lines are used to display active function key information and to display messages. Messages are displayed on the last line. The reverse video line is broken into a number of sections. Each section can contain the name of an active function key, the Function Key Label. Directly below the name of the key is an indicator of what should happen when you press the function key, the Function Key Action.
Figure 6-8 Sample JAMS Screen
Many of the options available from the JAMS Main Menu are
maintenance functions. Maintenance functions are used to add, change,
delete and inquire into definitions of JAMS objects such as
Jobs or Setups. The following sections explain how to use a
JAMS maintenance function.
6.2.9.1 Maintenance Mode Menu/Indicator
Most of the maintenance screens available to you have multiple modes. For example, if you select Job Definitions after selecting Definitions from the Main Menu, the Job Definitions maintenance screen is displayed and the Maintenance Mode Menu is displayed on the third line of the terminal. The current mode is highlighted with reverse video. Use the arrow keys (or [Tab] and [Ctrl/H]) to change the highlighted mode and press [Return] when the mode you desire is highlighted.
You can also enter the first letter of the desired mode to select a maintenance mode.
The possible options available on the Maintenance Mode Menu are:
Show - Display data with no update capabilities.
Modify - Modify existing data records.
Add - Add new data records.
Copy - Copy an existing record to a new record.
Delete - Delete existing data records.
If the JAMS Access Control has been used to limit access, only
the options which are currently available to you are displayed. If
there is only one option available, it is automatically selected and
you skip over the Maintenance Mode Menu.
6.2.9.2 Key Fields
Once you have selected an option from the Main Menu and selected a Maintenance Mode (if needed), the cursor moves into the data entry portion of the screen. The first step is to select a data record to process. You select a record by entering a value into one or more key fields. These fields are highlighted with reverse video and are the only fields the cursor will move to.
After you have entered the key fields, press [Return], and the specified data will be retrieved, displayed, and the cursor will move into the first data field.
If the data could not be located or you selected Add mode and the data could be located, an appropriate message is displayed and the cursor remains in the key field(s).
Remember that you can use the [Find] key if you do not
remember (or want to type) the key field information.
6.2.9.3 Data Entry Screens
One you have selected an object you are presented with either a data
entry screen or a menu of options. Simple objects, like a Variable
Definition, present a data entry screen which contains all of the
attributes of the object. Complex objects, like a Job Definition,
present a menu of options. When you select one of the options you are
presented with a data entry screen which contains the attributes which
pertain to the selected option. Some of the options may present a list
screen when the option may have multiple occurrences. An example of
this would be the parameters for a Job Definition. Since a Job may have
many parameters, when you select the Parameters option you are
presented with a list of the Jobs Parameters. When you select a
parameter (or insert a new one) you are presented with a data entry
screen which has the attributes for the selected parameter.
6.2.9.4 Special Function Keys
Some of the maintenance functions also have special function keys. If a special function key is used, it will be shown in the function key legend at the bottom of the screen. An example of this would be Trigger Definitions. When you select a Trigger, the Triggers information is displayed in a data entry screen but you also have two special function keys. One to display the Triggers Events and one to display the Triggers Actions.
| Previous | Next | Contents | Index |
| Copyright © 2000, MVP Systems, Inc. All rights reserved. |